Introduction
We are all familiar with text search which returns document similar to our query. It is also possible to perform similar search but with images! In this post we will explore how we can implement an image search similar to Google’s reverse image search. There are several applications of image search. For example an e-commerce website could allow users to upload a picture of a shirt their friends are wearing and using image search, it can find similar shirts from its catalog. It can also be used to find visually similar images for recommendation engine or to find duplicates.
Note: I’ve used Jupyer notebook to run the code in this post, so you might find some Jupyter notebook specific commands here and there. Full source code is available here.
Implementation
The basic approach for any neural network based search application is as follows:
Indexing existing images in catalog
We need to “index” our images into a vector database. I’m using the term database loosely here. It can be a in-memory numpy array or other applications like OpenSearch, Milvus, FAISS etc. that support saving vectors and performing Nearest Neighbors search.
For every image, we need to extract feature vector using some model. Deep neural networks are a good choice to extract these features. For this demo, I’ll use inception_resnet_v2 model from Tensoflow Hub as a feature extractor/vectorizer.
Query time
During query time, we have an input image. We again use the same vectorizer to extract feature vector and perform Nearest Neighbor search in the VectorDB. For this demo, the VectorDB is just an in-memory numpy array and KNNSearch is an instance of sklearn.neighbors.NearestNeighbors. For production use case, generally OpenSearch or FAISS can act as VectorDB as well as perform KNN search.
First let’s load all the required libraries.
1
2
3
4
5
6
7
8
9
10
import numpy as np
import tensorflow as tf
import matplotlib.pyplot as plt
import tensorflow_datasets as tfds
import tensorflow_hub as hub
import functools

print(tf.__version__) # 2.4.1
print(tfds.__version__) # 4.5.2
print(hub.__version__) # 0.10.0
Dataset
We’ll use “imagenette” dataset. It is a subset of 10 easily classified classes from Imagenet dataset. It was prepared by Jeremy Howard and its homepage can be found here. I chose this dataset because the pre-trained models that we find in the Internet is generally trained on ImageNet dataset and such models can extract meaningful feature vectors out of these images. If you load another dataset for e.g. images of chest x-rays or images of clothing items, then the model will not produce meaningful vectors as it has never seen those kind of images.
The code below loads “imagenette” using Tensorflow Datasets library. All we’ve done is resize the image into desired size and normalize the pixel values to be between 0 and 1.
1
2
3
4
5
6
7
8
9
10
11
12
13
14
15
16
17
18
19
20
21
22
23
24
25
26
27
ds = tfds.load("imagenette")
def extract_image(example):
    image = example['image']
    return image

def preprocess_image(image, height, width):
    image = tf.image.resize_with_crop_or_pad(image, target_height=height, target_width=width)
    image = tf.cast(image, tf.float32) / 255.0
    return image


def get_image_batches(batch_size=128, height=256, width=256):
    partial_preprocess_image = functools.partial(preprocess_image, height=height, width=width)
    train_ds = ds['train']
    train_ds = ( train_ds.map(extract_image)
                .map(partial_preprocess_image)
                .cache()
                .shuffle(buffer_size=1000)
                .batch(batch_size)
                .prefetch(tf.data.AUTOTUNE)
                )
    return train_ds


BATCH_SIZE = 32
IMG_WIDTH = IMG_HEIGHT = 256
train_ds = get_image_batches(batch_size=BATCH_SIZE, height=IMG_HEIGHT, width=IMG_WIDTH)
Tensorflow Datasets is a powerful library with lot of features and can handle huge amount of datasets that do not fit in the memory. However, for the purposes of this demo, let’s load about 640 images into memory.
1
2
images = np.array([img for batch in train_ds.take(20) for img in batch]) # take 20 batches
print(images.shape) # (640, 256, 256, 3)
Vectorizing images
Now that we have the images, we need to extract feature vectors. We’ll load a model that was trained on ImageNet dataset as our vectorizer. We also let the model know what image size to expect when “predicting”.
1
2
3
4
vectorizer = tf.keras.Sequential([
    hub.KerasLayer("https://tfhub.dev/google/imagenet/inception_resnet_v2/feature_vector/5", trainable=False)
])
vectorizer.build([None, IMG_HEIGHT, IMG_WIDTH, 3])
The code above will download the model from Tensorflow Hub if it is not already downloaded and load it in memory. Now extracting vectors is as simple as calling predict method of the model.
1
2
features = vectorizer.predict(images, batch_size=BATCH_SIZE)
print(features.shape) # (640, 1536)
From the output, we see that for each image, we have a feature vector of size 1536.
Finding similar Images
Now comes the fun part - performing image search! As explained earlier, we’ll use sklearn library to create a NearestNeighbors model and use it to find similar images.
1
2
3
from sklearn.neighbors import NearestNeighbors
knn = NearestNeighbors(n_neighbors=5, metric="cosine")
knn.fit(features)
That’s it! We can now use knn object to find nearest neighbors of any given input feature vector. The following code shows how an input image can be used to find similar images and plot it for visualization.
1
2
3
4
5
6
7
8
9
10
11
12
13
14
15
16
17
18
19
20
21
22
image = images[10] # take an existing image or create a numpy array from PIL image
image = np.expand_dims(image, 0) # add a batch dimension
feature = vectorizer.predict(image)

distances, nbors = knn.kneighbors(feature)
# output is a tuple of list of distances and list nbors of each image
# so we take the first entry from those lists since we have only one image
distances, nbors = distances[0], nbors[0]

nbor_images = [images[i] for i in nbors]
fig, axes = plt.subplots(1, len(nbors)+1, figsize=(10, 5))

for i in range(len(nbor_images)+1):
    ax = axes[i]
    ax.set_axis_off()
    if i == 0:
        ax.imshow(image.squeeze(0))
        ax.set_title("Input")
    else:
        ax.imshow(nbor_images[i-1])
        # we get cosine distance, to convert to similarity we do 1 - cosine_distance
        ax.set_title(f"Sim: {1 - distances[i-1]:.2f}")

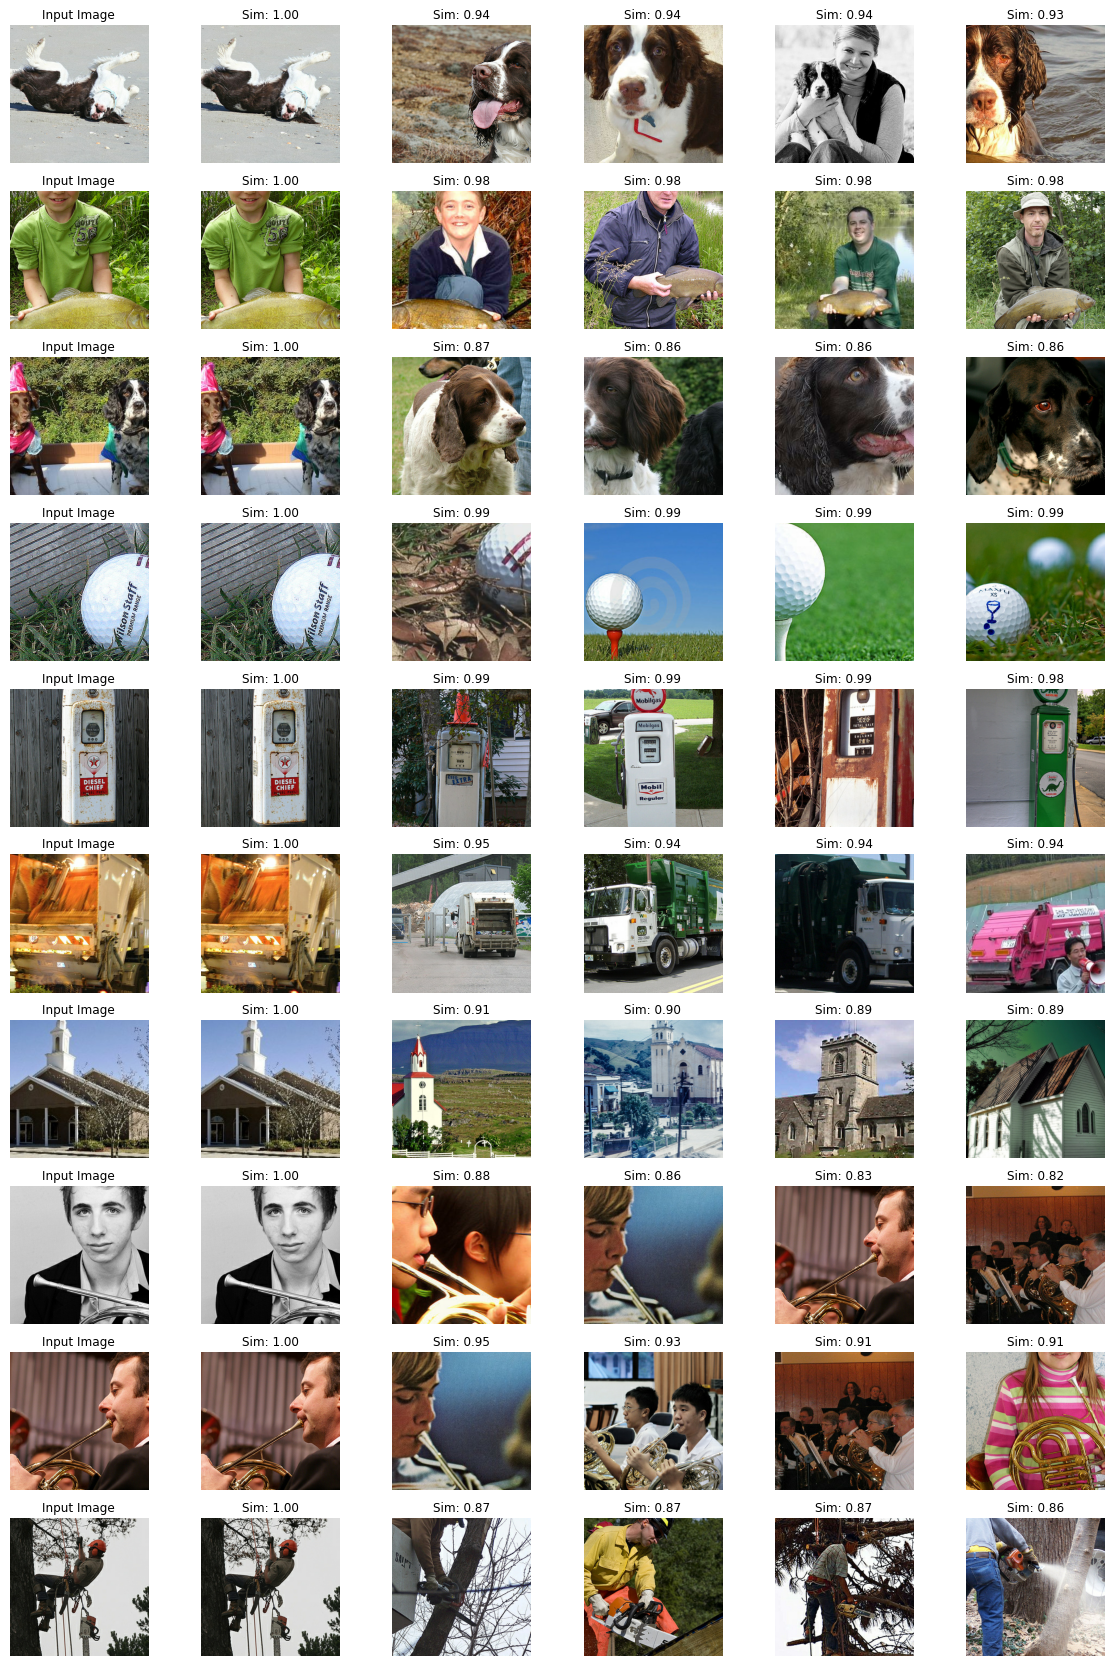
In the figure above, the first column is input image and the remaining images are the results from KNN search. The first similar image (2nd column) is exactly same as the input because we used the same image as input. This also serves as a sanity check. Looking at the results, it looks suprisingly good. All the images are of a petrol (gas) station.
However, we should keep in mind that the model was trained on ImageNet data and for this demo we used Imagenette dataset, which is a subset of ImageNet dataset. Also, Imagenette contains images from classes which are easily classified. For e.g. there are images of dogs, golf balls, people holding fish, fuel station, garbage trucks, houses etc. These images are visually distinct from each other and is relatively easy for a model.
This is not always the case in real world though. For example images of monitors and televisions look pretty much identical. In this case, the model should somehow be trained to see the difference between a tv and monitor and I doubt the pre-trained model would be able to perform well on images from different domain without finetuning.
Here are more input images and similar looking images
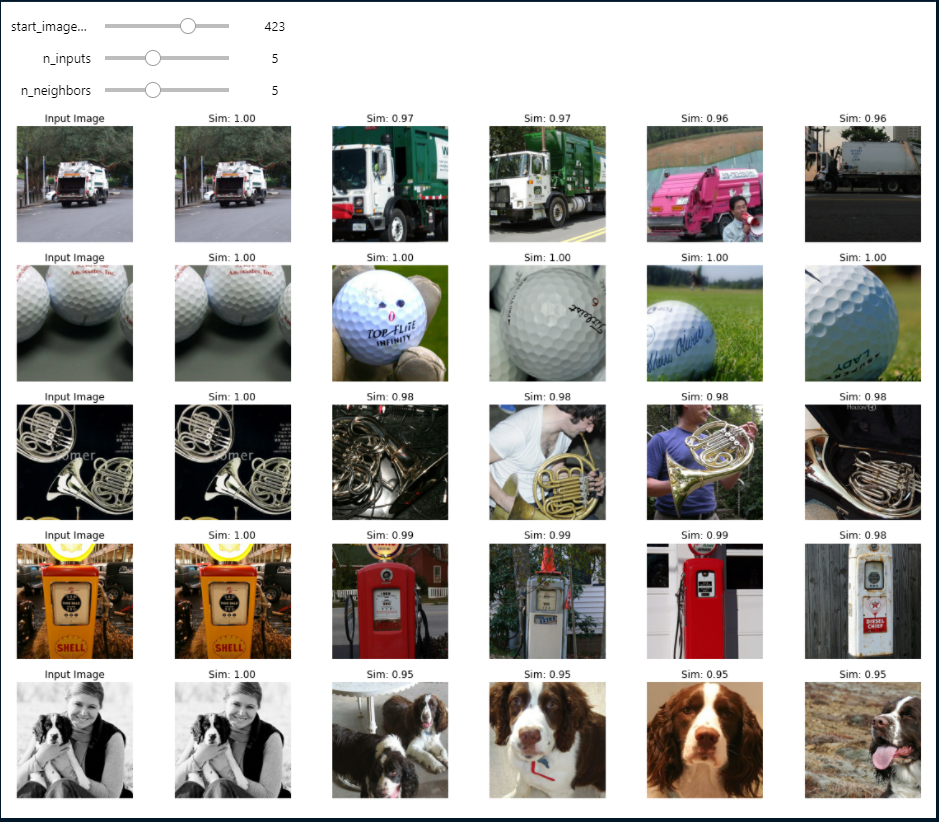
To explore more, I also created a small Jupyter widget. You can use the controls shown in the screen to play around.
1
2
3
4
5
6
7
8
9
10
11
12
13
14
15
16
17
18
19
20
21
22
23
24
25
26
27
28
def show_similar_images(start_image_idx, n_inputs=5, n_neighbors=10):
    input_images = images[start_image_idx:start_image_idx+n_inputs]
    features = vectorizer.predict(input_images)
    knn_output = knn.kneighbors(features, n_neighbors=n_neighbors)

    images_with_distances_and_nbors = zip(input_images, *knn_output)

    fig, axes = plt.subplots(len(input_images), n_neighbors+1, figsize=(20, len(input_images)*3))

    for i, (image, distances, nbors) in enumerate(images_with_distances_and_nbors):
        for j in range(n_neighbors+1):
            ax = axes[i, j]
            img = image if j==0 else images[nbors[j-1]]
            if j == 0:
                ax.set_title("Input Image")
            else:
                ax.set_title(f"Sim: {1-distances[j-1]:.2f}")
            ax.set_axis_off()
            ax.imshow(img)

    fig.savefig("02-image-search-grid.png")

import ipywidgets as w
w.interact(show_similar_images,
    start_image_idx=w.IntSlider(max=len(images)-1, continuous_update=False),
    n_inputs=w.IntSlider(min=2, value=5, max=10, continuous_update=False),
    n_neighbors=w.IntSlider(min=2, value=5, max=10, continuous_update=False),
)
Conclusion
In this post we saw how we can implement a simple image search. We use a pre-trained model to generate vectors out of the images so this will not necessarily work for images from all domains. There is still a lot to do to put this in a production setup. In future posts we will explore how we can use OpenSearch (ElasticSearch) to store the vectors and do KNN search and also fine tune a pre-trained model to our domain.


Comments