In this post, we’ll implement a deep neural network that can convert black and white image to color. In this problem, the input as well as output of the model is an image so we’ll build a fully convolutional neural network. In particular, we’ll implement a model called U-Net.
U-Net was originally proposed for biomedical image segmentation and has shown remarkable results in image segmentation. It extends encoder-decoder model with skip connections (gray arrows in the figure). The basic idea is that the encoding phase takes an input and compresses the input by passing it through different convolutional layers. Now using this compressed representation of the input, the decoding phase produces the final output. During decoding phase, transposed convolution layers or upsampling layers are typically used. Because the decoding phase only sees the compressed representation of original input, it might miss important features of image that were lost during the encoding phase. That’s where the skip-connections come to the rescue. They provide the output of each step in encoding phase to the corresponding step in decoding phase so that the decoder can utilize these information as well.
Dataset
For this experiment, I’ve collected images from https://www.reddit.com/r/EarthPorn/. I used https://github.com/RipMeApp/ripme to download 560 images from that sub-reddit. Next, we’ll create Keras image generator to load these images and feed them to the model.
1
2
3
4
5
6
7
8
9
10
11
12
13
14
15
16
17
18
19
20
21
22
23
24
25
input_dir = '../input'
seed = 1
validation_split = 0.7
from keras.preprocessing.image import ImageDataGenerator
from PIL import ImageFile
ImageFile.LOAD_TRUNCATED_IMAGES = True

data_gen_args = dict(rescale=1/255.0,
                     zoom_range=0.2,
                     rotation_range=30.,
                     width_shift_range=0.1,
                     height_shift_range=0.1,
                     validation_split=validation_split)

color_datagen = ImageDataGenerator(**data_gen_args)
bw_datagen = ImageDataGenerator(**data_gen_args)


train_color_generator = color_datagen.flow_from_directory(input_dir, class_mode=None, seed=seed, subset='training')
train_bw_generator = bw_datagen.flow_from_directory(input_dir, color_mode='grayscale', class_mode=None, seed=seed, subset='training')
valid_color_generator = color_datagen.flow_from_directory(input_dir, class_mode=None, seed=seed, subset='validation')
valid_bw_generator = bw_datagen.flow_from_directory(input_dir, color_mode='grayscale', class_mode=None, seed=seed, subset='validation')

train_generator = zip(train_bw_generator, train_color_generator)
validation_generator = zip(valid_bw_generator, valid_color_generator)
I’ve created two ImageDataGenerator but with same seed. Also, I’ve just used a parameter in flow_from_directory function to convert to grayscale image. Then using zip function, I created the final generators that we can use for training and validation.
Let’s check if our generators behave as expected.
1
2
3
4
5
6
7
8
9
10
x, y = next(train_generator)
print(x.shape, y.shape)
print(x.min(), x.max(), y.min(), y.max())
#Out: (32, 256, 256, 1) (32, 256, 256, 3)
#Out: 0.0 1.0 0.0 1.0
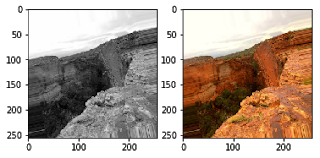
fig, (ax1, ax2) = plt.subplots(1, 2)
idx = np.random.randint(0, len(x))
ax1.imshow(np.squeeze(x[idx], axis=-1), cmap='gray')
ax2.imshow(y[idx])
We can see that our input consists of grayscale images and output of color images. We also rescaled the pixel values so that they lie between 0 and 1.
Model
We’ll use Keras to build our model. The input will be a grayscale image and output will be a RGB image. During encoding phase, we’ll use convolution layers with LeakyReLU activation. We’ll also increase the number of filters as we add these layers. For decoding steps, we’ll use UpSampling layer followed by convolution layer.
1
2
3
4
5
6
7
8
9
10
11
12
13
14
15
16
17
18
19
20
21
22
23
24
25
26
27
28
29
30
31
32
33
34
35
36
37
38
39
40
41
42
43
44
45
46
47
48
49
50
51
52
53
54
from keras.layers import Input, Reshape, Dropout, Concatenate
from keras.layers import BatchNormalization, Activation
from keras.layers.advanced_activations import LeakyReLU
from keras.layers.convolutional import UpSampling2D, Conv2D
from keras.models import Model
from keras.optimizers import Adam

def conv2d(layer_input, filters, f_size=4, bn=True):
    """Layers used during downsampling"""
    d = Conv2D(filters, kernel_size=f_size, strides=2, padding='same')(layer_input)
    d = LeakyReLU(alpha=0.2)(d)
    if bn:
        d = BatchNormalization(momentum=0.8)(d)
    return d

def deconv2d(layer_input, skip_input, filters, f_size=4, dropout_rate=0):
    """Layers used during upsampling"""
    u = UpSampling2D(size=2)(layer_input)
    u = Conv2D(filters, kernel_size=f_size, strides=1, padding='same', activation='relu')(u)
    if dropout_rate:
        u = Dropout(dropout_rate)(u)
    u = BatchNormalization(momentum=0.8)(u)
    u = Concatenate()([u, skip_input])
    return u

gf = 32 # number of filters
# Image input
d0 = Input(shape=(256, 256, 1))

# Downsampling
d1 = conv2d(d0, gf)
d2 = conv2d(d1, gf*2)
d3 = conv2d(d2, gf*4)
d4 = conv2d(d3, gf*8)
d5 = conv2d(d4, gf*8)
d6 = conv2d(d5, gf*8)
d7 = conv2d(d6, gf*8)

# Upsampling
u1 = deconv2d(d7, d6, gf*8)
u2 = deconv2d(u1, d5, gf*8)
u3 = deconv2d(u2, d4, gf*8)
u4 = deconv2d(u3, d3, gf*4)
u5 = deconv2d(u4, d2, gf*2)
u6 = deconv2d(u5, d1, gf)

u7 = UpSampling2D(size=2)(u6)
output_img = Conv2D(3, kernel_size=4, strides=1, padding='same', activation='sigmoid')(u7)

model = Model(d0, output_img)
model.summary()
model.compile(optimizer='adam', loss='mse', metrics=['mse', 'mae'])
model.fit_generator(train_generator, steps_per_epoch=20, epochs=2, validation_data=validation_generator, validation_steps=3)
model.save_weights("./model.weights")
I’ve trained it for a couple of epochs. Now let’s visualize the predictions.
1
2
3
4
5
6
7
8
9
10
11
12
13
14
15
16
17
18
x, y_true = next(validation_generator)
y_pred = model.predict_on_batch(x)
# plot input, actual and predictions side by side
max_images = min(20, len(x))
fig, axes = plt.subplots(max_images, 3, figsize=(10, 40))
for i in range(0, max_images):
    ax1, ax2, ax3 = axes[i]
    ax1.imshow(np.squeeze(x[i], axis=-1), cmap='gray')
    ax1.set_title('Input B/W')
    ax2.imshow(y_true[i])
    ax2.set_title('Actual Color')
    ax3.imshow(y_pred[i])
    ax3.set_title('Predicted Color')
for ax in axes.flat:
    ax.set_xticklabels([])
    ax.set_yticklabels([])
plt.subplots_adjust(wspace=0.01,hspace=0.01)
plt.tight_layout()

Conclusion
To summarize, we implemented a U-Net model to convert black and white image to color image. We also used ImageDataGenerator provided by Keras to create the data generators.


Comments